
Website Widget
The website widget is a floating chat button that sits in the bottom-right corner of your website. A visitor clicks it, a chat window opens, and your Helin agent answers their questions using the knowledge you gave it. It's one line of code. You paste it once and you're done.
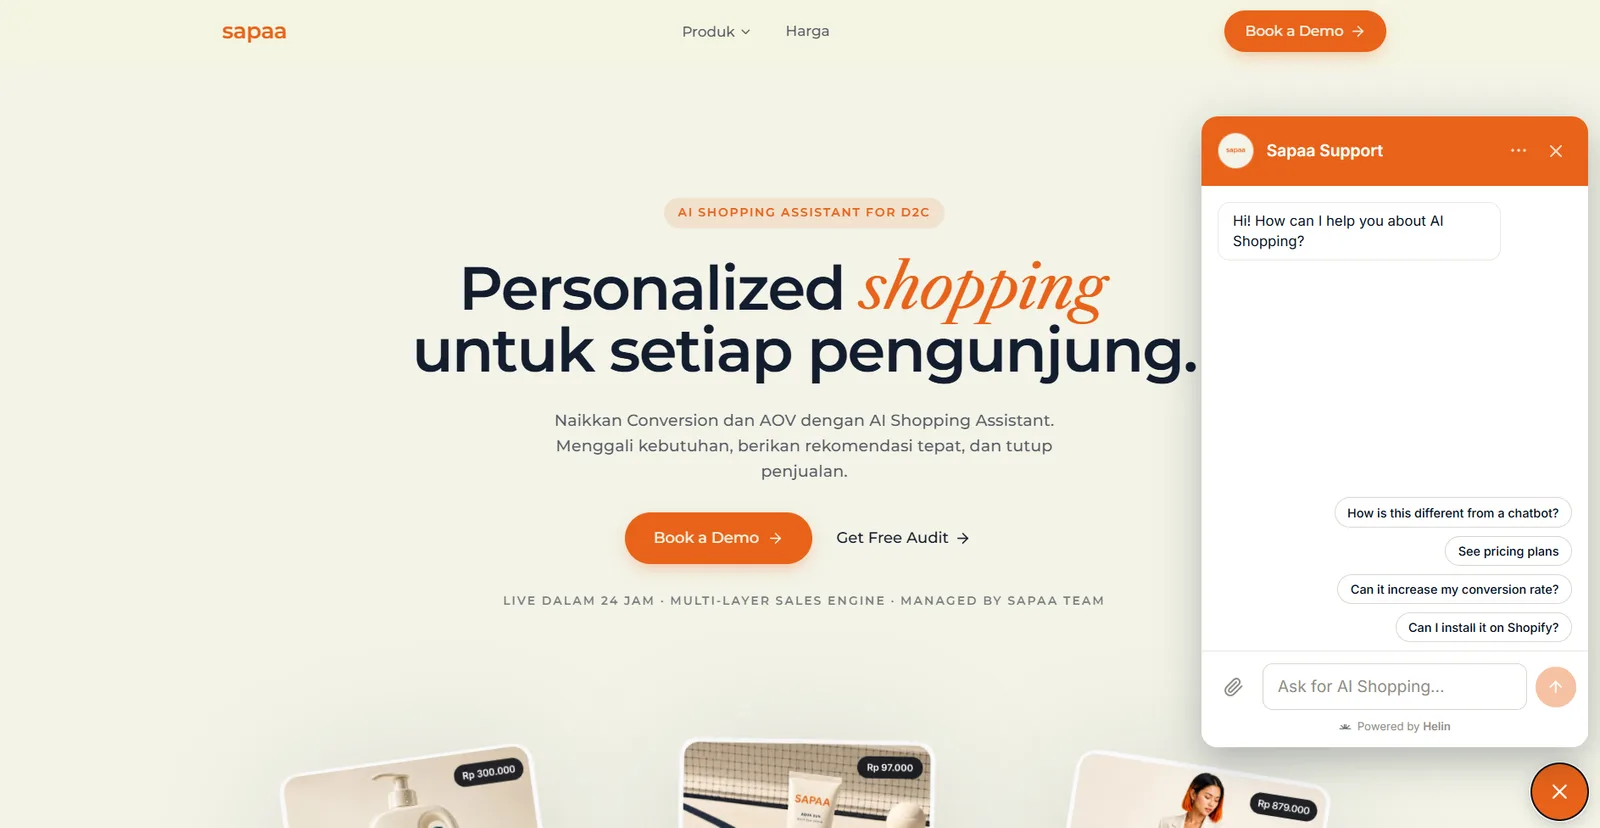
What your visitors see
- A round chat button appears in the bottom-right corner of every page you installed it on.
- Clicking it opens a chat window (about 380px wide) above the button.
- On phones, the chat opens fullscreen instead, so it's comfortable to type in.
- The visitor asks a question. Your agent answers from your knowledge base: your uploaded documents, pasted text, and the pages you trained it on.
- If the answer isn't in your knowledge base, the agent says so instead of making something up.
The chat window loads inside an iframe, a sealed frame separate from your page. This matters more than it sounds: your website's CSS can never break the widget's design, and the widget's styling can never leak out and break your website. This is the same approach Intercom and Chatbase use.
Your install snippet
Find it in your Helin dashboard:
- Open your agent.
- Go to the Playground.
- Click Deploy, then Website widget.
- Click Copy snippet.
It looks like this:
<script src="https://app.gethelin.com/embed.js" id="YOUR_AGENT_KEY"></script>Two parts:
| Part | What it is |
|---|---|
src | Helin's loader script, about 1 KB, cached worldwide. This is the same for everyone. |
id | Your agent's public key. This is what tells Helin which agent to load, which knowledge base to answer from, and which colors and greeting to use. Every agent has its own key. |
YOUR_AGENT_KEY). If you paste the placeholder, nothing will load.Where it goes
Paste it just before the closing </body> tag, on every page where you want the widget.
Putting it at the end of the body means your page's own content loads first and the widget loads after, so the widget never makes your site feel slower.
Install: any website (you edit the HTML)
If you control your page templates, whether a hand-coded site, a static site, or any framework, paste the snippet right before </body>:
<!doctype html>
<html>
  <head>
    <title>Your site</title>
  </head>
  <body>
    <!-- ...your page content... -->

    <!-- Helin website widget -->
    <script src="https://app.gethelin.com/embed.js" id="YOUR_AGENT_KEY"></script>
  </body>
</html>
Tips
- To show the widget on every page, put the snippet in your shared layout, template, or footer include: the one file that every page uses. Don't paste it into pages one by one.
- To show it on only some pages, put it only on those pages.
- You don't need to add any CSS or install anything. The widget styles itself.
Reload your site. The chat button appears in the bottom-right corner.
Install: WordPress
You don't need to edit any code files. The plugin method below is the safest, because it survives theme updates.
Option A: header/footer plugin (recommended, no coding)
- In your WordPress admin, go to Plugins › Add New.
- Search for a header-and-footer code plugin. WPCode or Insert Headers and Footers are the common ones. Click Install Now, then Activate.
- Open the plugin's settings. Insert Headers and Footers uses Settings › Insert Headers and Footers; WPCode uses Code Snippets › Header & Footer.
- Paste your snippet into the Footer box (the field described as running before
</body>). - Click Save.
<script src="https://app.gethelin.com/embed.js" id="YOUR_AGENT_KEY"></script>The widget now loads on every page of your site.
Option B: block theme (Site Editor, WordPress 6.x)
If your theme uses the Site Editor:
- Go to Appearance › Editor › Templates (or Patterns › Template Parts › Footer).
- Edit the Footer template part.
- Add a Custom HTML block at the bottom and paste the snippet.
- Click Save.
Option C: theme file (developers)
Add the snippet to your child theme's functions.php using the wp_footer hook:
add_action('wp_footer', function () {
  ?>
  <script src="https://app.gethelin.com/embed.js" id="YOUR_AGENT_KEY"></script>
  <?php
});Install: Shopify
Add the snippet to your theme layout so it loads on every page of your store: product pages, cart, collections, everything.
- In your Shopify admin, go to Online Store › Themes.
- On your current theme, click the three-dots button, then Edit code.
- In the file list on the left, open Layout › theme.liquid.
- Scroll to the bottom and find the closing
</body>tag. - Paste your snippet on the line just above
</body>. - Click Save.
    <!-- Helin website widget -->
    <script src="https://app.gethelin.com/embed.js" id="YOUR_AGENT_KEY"></script>
  </body>
</html>
Open your storefront and the chat button appears.
Notes for Shopify
- Duplicate your theme first if you want a safety net: three-dots, then Duplicate, before editing. You can roll back to the copy if anything goes wrong.
theme.liquidis the layout every page uses, which is why one paste covers the whole store. If your store uses a second layout (some themes havetheme.checkout.liquidor a custom layout), add the snippet there too if you want the widget on those pages.- Checkout pages are different. Shopify locks down checkout, and scripts pasted into
theme.liquiddo not run there. On Shopify Plus you can add scripts to checkout separately; on other plans the widget will not appear during checkout. This is a Shopify restriction, not a Helin one. - If you switch themes later, the snippet stays with the old theme. Paste it into the new theme's
theme.liquidas well.
Install: Webflow
Webflow lets you add custom code site-wide or per page. For a chat widget you almost always want site-wide.
Site-wide (recommended)
- Open your project, then Site settings › Custom code (newer Webflow: Project settings › Custom code).
- Find the Footer code box, labelled "before
</body>tag". - Paste your snippet.
- Save changes, then Publish your site.
One page only
- Open the page in the Designer.
- Click the gear icon (page settings) for that page.
- Scroll to Custom code › Before
</body>tag. - Paste, Save, then Publish.
.webflow.io or your custom domain). It does not run inside the Designer canvas. Publish first, then check the live site.Install: Framer
- Open your project, then Site settings › Custom Code (in some versions: Project settings › General › Custom Code).
- You'll see several slots. Find End of <body> tag.
- Paste your snippet there.
- Save, then Publish.
Install: Squarespace
- Go to Settings › Advanced › Code Injection.
- Paste your snippet into the Footer box.
- Save.
Install: Wix
- Go to your dashboard, then Settings › Custom Code (under Advanced).
- Click + Add Custom Code.
- Paste your snippet into the code box.
- Under Add Code to Pages, choose All pages.
- Under Place Code in, choose Body: end.
- Give it a name (e.g. "Helin chat") and click Apply.
Install: Google Tag Manager
Useful if you already manage scripts through GTM and don't want to touch your site's code.
- In GTM, go to Tags › New › Tag Configuration › Custom HTML.
- Paste your snippet into the HTML box.
- Under Triggering, choose All Pages.
- Name the tag (e.g. "Helin website widget"), Save, then Submit to publish the container.
Install: React, Next.js and other frameworks
The snippet is a plain script tag, so it works anywhere. Just load it after your app renders.
Next.js (App Router): add it to app/layout.tsx
import Script from "next/script";

export default function RootLayout({ children }: { children: React.ReactNode }) {
  return (
    <html lang="en">
      <body>
        {children}
        <Script
          src="https://app.gethelin.com/embed.js"
          id="YOUR_AGENT_KEY"
          strategy="afterInteractive"
        />
      </body>
    </html>
  );
}
Plain React (Vite, CRA)
The simplest option is to paste the snippet into index.html before </body>, exactly like a normal website. It doesn't need to live inside your component tree.
document.body, outside your app's root element, so it won't be removed or re-rendered by your framework.Customizing the widget
Everything about how the widget looks and greets people is set in the dashboard. You never edit the snippet. Go to your agent's Playground:
| Setting | Where | What it does |
|---|---|---|
| Display name | Content tab | The name shown in the chat window header. |
| Initial messages | Content tab | Messages shown before the visitor types anything, one per line. These are fixed text you write, not AI output. |
| Message placeholder | Content tab | The grey hint text in the message box. |
| Quick chats | Content tab | Suggested questions the visitor can tap instead of typing. |
| Avatar | Style tab | The agent's picture in the chat. |
| Primary color | Style tab | The chat header and accent color. |
| Chat bubble color | Style tab | The color of the floating launcher button on your site. |
Changes go live automatically. Once you save in the Playground, every site running your snippet picks it up on the next page load. You don't need to re-paste anything.
Multiple websites
One Helin account can run several agents, and each agent has its own key, its own knowledge base, and its own styling.
If you have two products or two websites, create two agents and use each one's own snippet. Don't reuse one key across unrelated sites: they'd share a knowledge base and their conversations would mix together in Activity.
How many agents you can create depends on your plan.
Troubleshooting
The chat button doesn't appear
Work through these in order:
- Are you looking at the published site? Webflow, Framer, Wix and Squarespace only run custom code on the live site, never in the editor preview. Publish first.
- Is the snippet before
</body>, not in<head>? In the<head>it may run before the page body exists and have nothing to attach to. - Is the
idyour real agent key? If it still saysYOUR_AGENT_KEY, or theidattribute is missing entirely, the widget stops and logs an error. Open your browser console (F12): a message starting with[Helin]tells you the key is missing. - Did the plugin or tag actually save and publish? WordPress plugins need to be activated; GTM containers need Submit, not just Save.
- Is something blocking scripts? Ad blockers, aggressive cookie-consent tools, or a strict Content Security Policy can block third-party scripts. See the CSP note below.
The chat button appears but the chat won't open
Open your browser console (F12) and look for errors. The most common cause is a Content Security Policy that blocks the iframe. You need to allow https://app.gethelin.com in script-src, frame-src, and connect-src:
script-src 'self' https://app.gethelin.com;
frame-src  'self' https://app.gethelin.com;
connect-src 'self' https://app.gethelin.com;
img-src    'self' data: https://app.gethelin.com;
The widget covers a button in my page's bottom-right corner
The chat button sits about 20px from the bottom-right edge. If it overlaps something important, like a cookie banner or a back-to-top button, move your element up or to the left. The widget deliberately sits on a very high layer so it's never hidden behind page content.
The agent answers "I don't have that information"
That's the widget working correctly: it only answers from your knowledge base and refuses to guess. Add the missing information in Data Sources, wait for the source to show Ready, and ask again.
Answers are wrong or out of date
Check Data Sources for old documents that contradict the new ones, and remove them. The agent can't tell which of two conflicting documents you meant.
Frequently asked
Will it slow down my site?
No. The loader is about 1 KB and only draws the button. The actual chat interface doesn't load until someone clicks.
Do I need to re-paste the snippet when I change settings?
No. The snippet only carries your agent key. Everything else is read live from Helin.
Can I put it on multiple sites?
Yes, technically: the same key works anywhere you paste it. But if the sites are different products, create a separate agent for each so their knowledge and conversations stay separate.
Does it work on mobile?
Yes. On screens under 500px wide the chat opens fullscreen, and the launcher button hides while the chat is open so it can't cover the conversation.
Can I put the button on the left instead?
Not currently. The button is fixed to the bottom-right.
Where do I see the conversations?
In your agent's Activity tab.